本文共 13845 字,大约阅读时间需要 46 分钟。
lemp wp
With site performance a key metric in Google’s ranking algorithms, more WordPress users are turning to dedicated, managed WordPress hosting such as WP Engine, Media Temple or SiteGround.
由于网站性能是Google排名算法中的关键指标,因此越来越多的WordPress用户正在转向专用的托管WordPress托管,例如WP Engine,Media Temple或SiteGround。
However, these can be expensive solutions for some, with costs starting at ~$30/site per month.
但是,对于某些人来说,这些解决方案可能是昂贵的解决方案,起价为每个站点每月约30美元。
If you’re comfortable with basic server administration and WordPress, it’s possible to setup your own, inexpensive hosting for small WordPress websites, that matches the performance of managed WordPress hosting providers using a LEMP Stack (Linux, nginx, MySQL, PHP).
如果您对基本的服务器管理和WordPress感到满意,则可以为小型WordPress网站设置自己的廉价主机,与使用LEMP堆栈(Linux,nginx,MySQL,PHP)的托管WordPress主机提供商的性能相匹配。
创建DigitalOcean虚拟专用服务器(VPS) (Creating a DigitalOcean Virtual Private Server (VPS))
This article uses DigitalOcean, but you can equally use services such as Linode, Vultr or a number of other providers. The other sections of this guide will equally apply, regardless of who you’re using.
本文使用DigitalOcean,但您同样可以使用Linode,Vultr等服务或许多其他提供程序。 无论您使用的是谁,本指南的其他部分都将同样适用。
First, register an account at .
首先,在注册一个帐户。
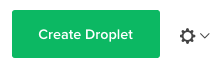
Once completed, click the Create Droplet button:
完成后,单击创建液滴按钮:
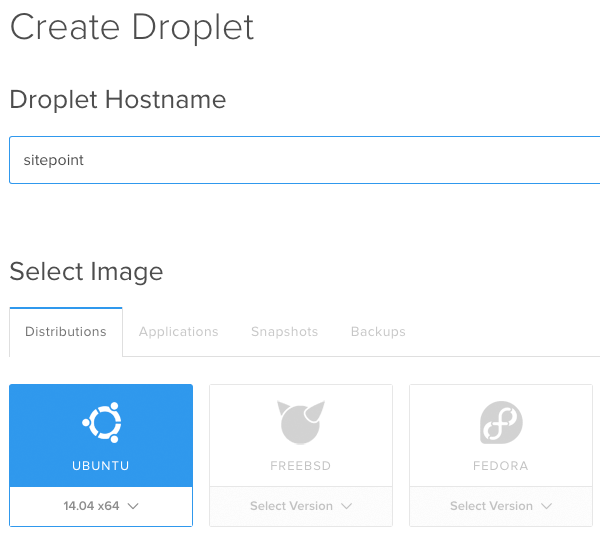
We’ll use the following settings for our VPS:
我们将对VPS使用以下设置:
Droplet Hostname: Enter something meaningful – perhaps your company or website name
Droplet主机名:输入有意义的内容-可能是您的公司或网站名称
Select Image: Choose Ubuntu 14.04 x64 – this should be selected by default
选择图像:选择Ubuntu 14.04 x64 –默认情况下应选择
Select Size: We’ll start with the $5/month option, which comes with 512 MB, 1 CPU, 20 GB SSD and 1000 GB Transfer
选择大小:我们将从每月5美元的选项开始,它具有512 MB,1个CPU,20 GB SSD和1000 GB传输空间
Select Region: Choose a region appropriate to your business. If you’re US based, select a USA region. If you’re UK based, select a UK region.
选择地区:选择适合您业务的地区。 如果您位于美国,请选择一个美国地区。 如果您是英国人,请选择一个英国地区。
Available Settings: Enabling the Backups option is recommended, as it’ll take nightly snapshots of your server. If something goes wrong, you can then roll back to the previous day’s backup.
可用设置:建议启用“ 备份”选项,因为它将对服务器进行夜间快照。 如果出现问题,则可以回滚到前一天的备份。
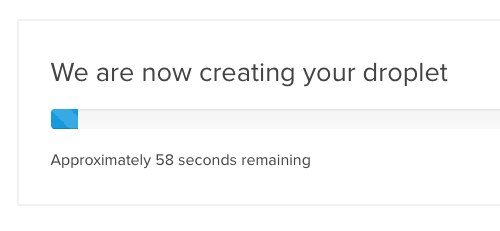
Click the Create Droplet button, and you’ll then see on screen progress whilst your VPS (Droplet) is created.
单击创建液滴按钮,然后您将在创建 VPS(液滴)的过程中看到屏幕进度。
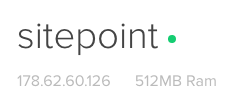
Once completed, you’ll see your VPS on screen. Make a note of the IP address:
完成后,您将在屏幕上看到VPS。 记下IP地址:
You’ll also receive an email with your root password, which you’ll need as well.
您还将收到一封电子邮件,其中包含您的超级用户密码。
登录您的VPS (Logging into Your VPS)
Next, let’s login to our VPS.
接下来,让我们登录到我们的VPS。
NOTE: In our example, to keep things simple, we’ll be using a password to login to our server. I’d recommend looking into using SSH keys for additional security.
注意:在我们的示例中,为简单起见,我们将使用密码登录服务器。 我建议您考虑使用SSH密钥以提高安全性。
视窗 (Windows)
For Windows users, download . Once downloaded, run PuTTY and enter the following information into the dialog box that appears:
对于Windows用户,请下载 。 下载完成后,运行PuTTY,然后在出现的对话框中输入以下信息:
- Host Name: Enter the IP address you made a note of above 主机名:输入上面记下的IP地址
- Connection type: SSH 连接类型:SSH
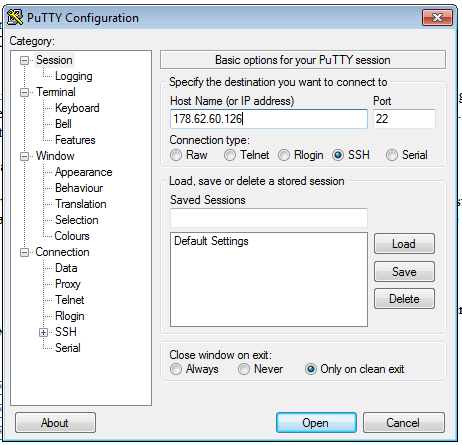
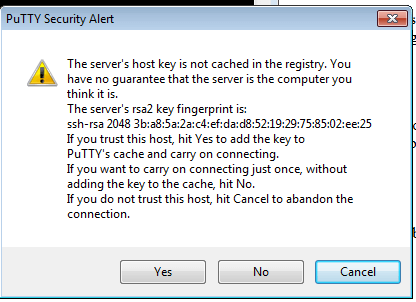
Click ‘Open’, and you should be presented with a security alert. This tells us that the server’s host key is new, and therefore asking us if we want to trust it. Click ‘Yes’.
单击“打开”,然后将显示一个安全警报。 这告诉我们服务器的主机密钥是新的,因此询问我们是否要信任它。 点击“是”。
Next, let’s login as the root user. Enter root for login as, and press ‘Enter’. You’ll then be prompted to enter your password; enter the password that was emailed to you. Don’t worry if you can’t see the password as you type it – this is for security. Press ‘Enter’ when done.
接下来,让我们以root用户身份登录。 输入root作为登录名 ,然后按“ Enter”。 然后将提示您输入密码; 输入通过电子邮件发送给您的密码。 出于安全考虑,如果您在输入密码时看不到密码,请不要担心。 完成后按“ Enter”。
Mac OS X (Mac OS X)
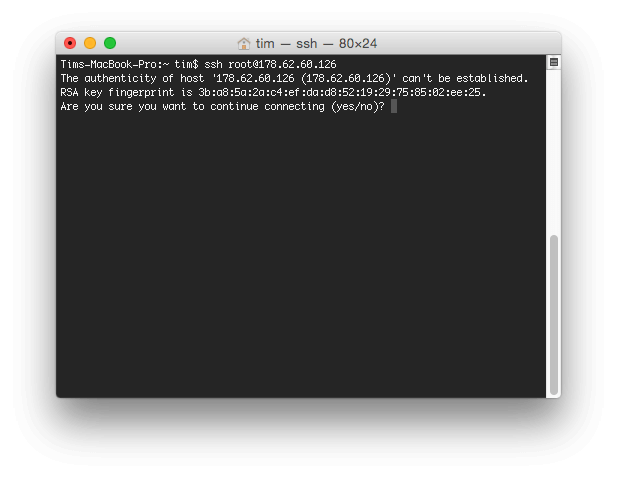
For Mac OS X users, open Terminal and enter the following command, replacing 123.123.123.123 with the IP address above:
对于Mac OS X用户,打开“终端”并输入以下命令,将123.123.123.123替换为上述IP地址:
ssh root@123.123.123.123
ssh root@123.123.123.123
You’ll be asked to accept the server key – type yes and press ‘Enter’:
系统将要求您接受服务器密钥-键入yes ,然后按Enter键:
Next, enter your password and press ‘Enter’.
接下来,输入密码,然后按“ Enter”。
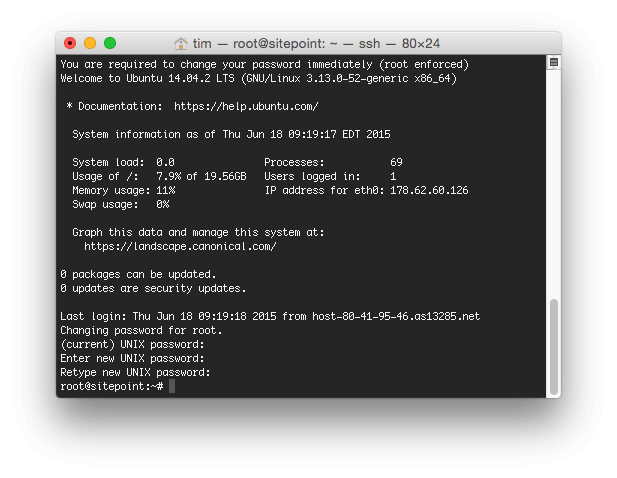
修改root密码 (Changing the Root Password)
The first time you login to your server, you may be prompted to change the root password:
首次登录服务器时,系统可能会提示您更改root密码:
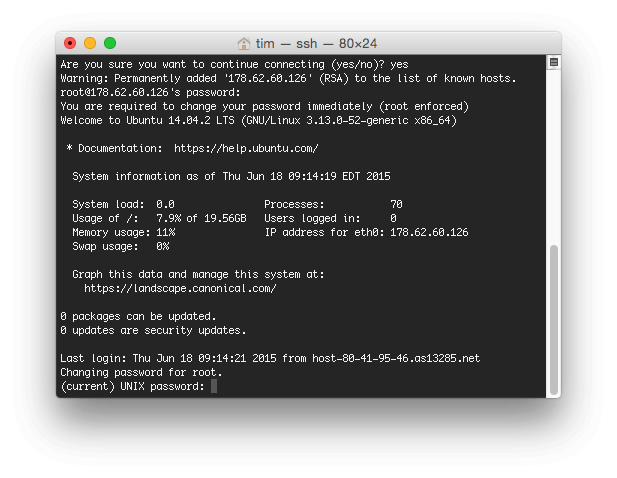
Enter the current password, and then enter a new password when prompted.
输入当前密码,然后在出现提示时输入新密码。
在Ubuntu上安装LEMP Stack (Installing the LEMP Stack on Ubuntu)
WordPress requires Apache or nginx, PHP and MySQL, as well as a few other components to get things working.
WordPress需要Apache或nginx,PHP和MySQL以及其他一些组件才能正常工作。
Ubuntu uses a package manager, which can be thought of as a command line based app store. Before we start downloading and installing components from it, we need to update its catalog by entering the following command:
Ubuntu使用软件包管理器,可以将其视为基于命令行的应用程序商店。 在开始从中下载和安装组件之前,我们需要通过输入以下命令来更新其目录:
sudo apt-get update
sudo apt-get update
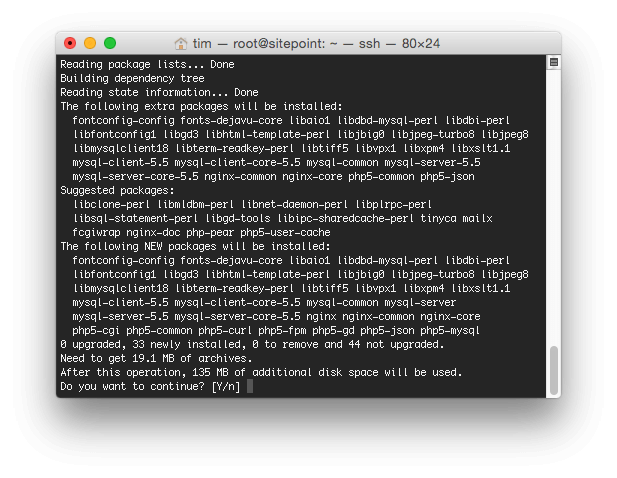
Once completed, we can then install our components:
完成后,我们可以安装组件:
sudo apt-get install nginx mysql-server php5-fpm php5-mysql php5-curl php5-gd php5-cgi
sudo apt-get install nginx mysql-server php5-fpm php5-mysql php5-curl php5-gd php5-cgi
You’ll be asked if you want to continue – type in Y, and press enter.
系统将询问您是否要继续-键入Y,然后按Enter。
配置MySQL (Configuring MySQL)
During the installation process, MySQL will ask you to set a new password for the root database user. Note that this is different from the root login for the server. For security, I’d strongly recommend making this a different password than the root login to your server.
在安装过程中,MySQL将要求您为根数据库用户设置新密码。 请注意,这与服务器的root登录不同。 为了安全起见,强烈建议您将此密码设置为与服务器的root登录名不同的密码。
Once the installation has completed, we need to run two more commands to complete the MySQL installation.
安装完成后,我们需要再运行两个命令以完成MySQL安装。
First, enter:
首先,输入:
sudo mysql_install_db
sudo mysql_install_db
Then, enter:
然后输入:
sudo mysql_secure_installation
sudo mysql_secure_installation
- Type in your current MySQL root password, which you set above. 输入您在上面设置的当前MySQL根密码。
Enter
nwhen asked to change the root password (as we’ve already done this, no need to do it again).当要求您更改root密码时,请输入
n(因为我们已经完成了此操作,因此无需再次进行设置)。Enter
Ywhen asked to remove anonymous users.当要求删除匿名用户时,输入
YEnter
Ywhen asked to disallow root login remotely.当询问是否禁止远程root登录时,输入
YEnter
Ywhen asked to remove the test database and access to it.当要求删除测试数据库并访问它时,输入
YEnter
Ywhen asked to reload privilege tables.当要求重新加载特权表时,输入
Y
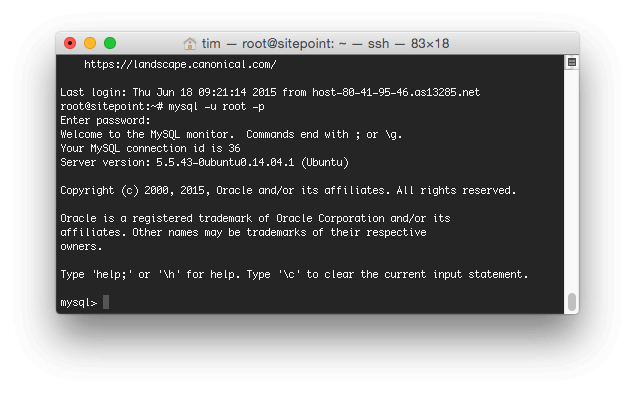
Finally, we need to create a MySQL user and database:
最后,我们需要创建一个MySQL用户和数据库:
mysql -u root -p
mysql -u root -p
Enter your MySQL password when prompted, and if correct, you’ll be presented with the MySQL prompt:
在提示时输入您MySQL密码,如果正确,将显示MySQL提示:
Let’s create our new database and user – replace ‘password’ with a unique password:
让我们创建新的数据库和用户–用唯一的密码替换'password':
CREATE DATABASE wordpress; CREATE USER 'wordpress'@'localhost' IDENTIFIED BY 'password'; GRANT ALL PRIVILEGES ON * . * TO 'wordpress'@'localhost'; FLUSH PRIVILEGES; exit
CREATE DATABASE wordpress; CREATE USER 'wordpress'@'localhost' IDENTIFIED BY 'password'; GRANT ALL PRIVILEGES ON * . * TO 'wordpress'@'localhost'; FLUSH PRIVILEGES; exit
配置PHP (Configuring PHP)
We need to make a slight alteration to get PHP working with nginx:
我们需要做一些改动才能使PHP与nginx一起工作:
sudo nano /etc/php5/fpm/php.ini
sudo nano /etc/php5/fpm/php.ini
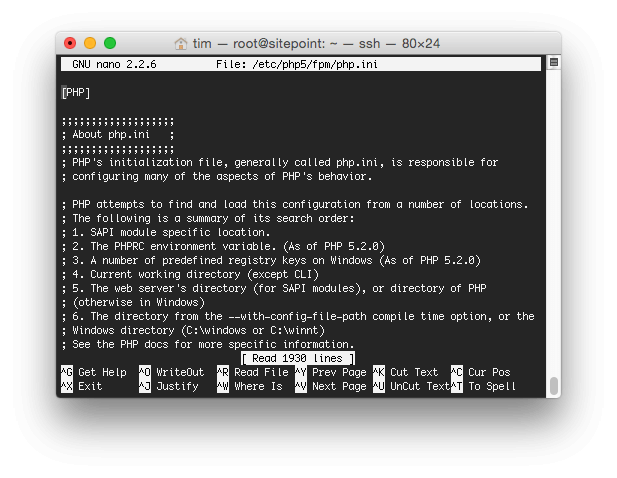
Hold down the Ctrl key and press W, and you’ll be asked to type into a Search field. Enter:
按住Ctrl键并按W ,然后将要求您在“搜索”字段中键入内容。 输入:
fix_pathinfo and press Enter:
fix_pathinfo并按Enter:
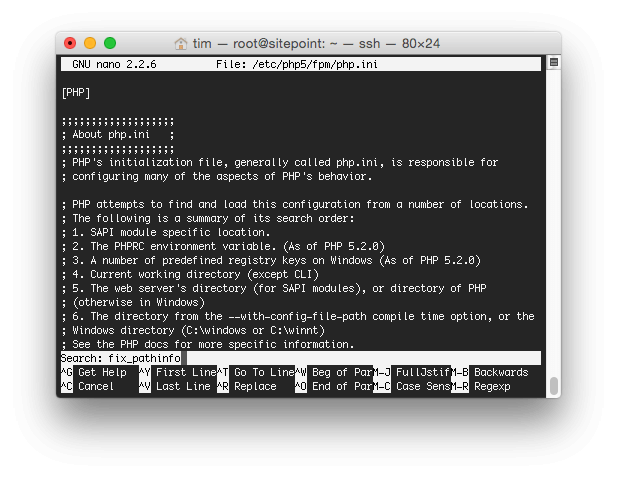
Change the following line:
更改以下行:
;cgi.fix_pathinfo=1
;cgi.fix_pathinfo=1
to:
至:
cgi.fix_pathinfo=0
cgi.fix_pathinfo=0
To save our changes, hold down the Ctrl key and press X, followed by Y and then the Enter key.
要保存更改,请按住Ctrl键,然后按X ,再按Y ,然后按Enter键。
配置nginx (Configuring nginx)
We need to change nginx’s configuration to get things working with WordPress:
我们需要更改nginx的配置以使WordPress正常工作:
sudo nano /etc/nginx/sites-available/default
sudo nano /etc/nginx/sites-available/default
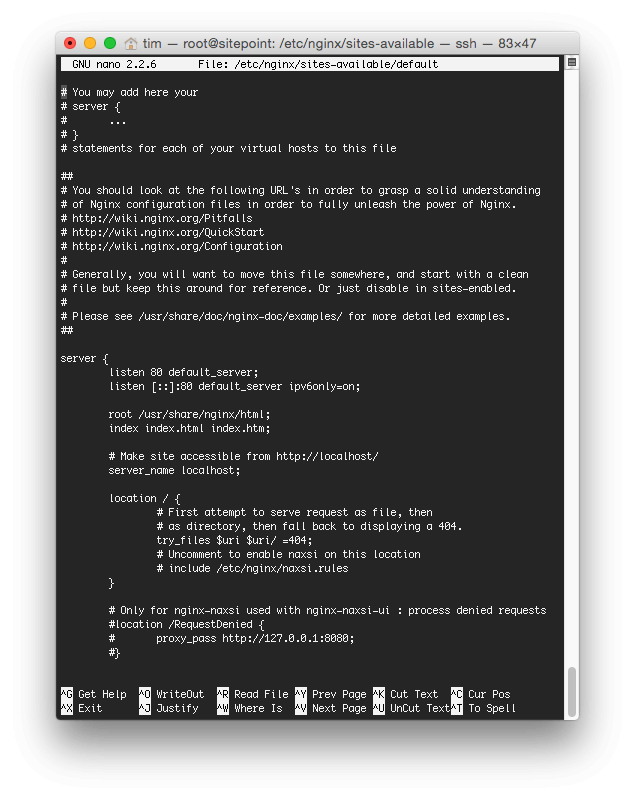
Let’s remove the current configuration. Keep pressing Ctrl and K to cut each line of the configuration file, until it’s blank:
让我们删除当前配置。 按住Ctrl和K剪切配置文件的每一行,直到其为空:
Next, copy the nginx configuration below and paste it into your Terminal/PuTTY window, remembering to change domain.com to your domain name:
接下来,复制下面的nginx配置并将其粘贴到“终端/ PuTTY”窗口中,切记将domain.com更改为您的域名:
server { # Listen on port 80 listen 80 default_server;
server { # Listen on port 80 listen 80 default_server;
文件根 (Document Root)
root /usr/share/nginx;
root /usr/share/nginx;
网域 (Domain(s))
server_name www.domain.com;
server_name www.domain.com;
指数 (Index)
index index.php;
index index.php;
GZIP压缩 (GZIP Compression)
gzip on; gzip_types text/plain image/svg+xml text/javascript application/x-javascript text/xml text/css; gzip_vary on;
gzip on; gzip_types text/plain image/svg+xml text/javascript application/x-javascript text/xml text/css; gzip_vary on;
缓存静态文件 (Cache Static Files)
location ~* \.(js|css|png|jpg|jpeg|gif|ico|svg|woff)$ { expires 1y; }
location ~* \.(js|css|png|jpg|jpeg|gif|ico|svg|woff)$ { expires 1y; }
载入档案 (Load File)
location / { try_files $uri $uri/ /index.php?q=$uri&$args; }
location / { try_files $uri $uri/ /index.php?q=$uri&$args; }
# Pass the PHP scripts to FastCGI server location ~ \.php$ { fastcgi_pass unix:/var/run/php5-fpm.sock; fastcgi_index index.php; fastcgi_param SCRIPT_FILENAME $document_root$fastcgi_script_name; include fastcgi_params; } }
# Pass the PHP scripts to FastCGI server location ~ \.php$ { fastcgi_pass unix:/var/run/php5-fpm.sock; fastcgi_index index.php; fastcgi_param SCRIPT_FILENAME $document_root$fastcgi_script_name; include fastcgi_params; } }
To save our changes, hold down the Ctrl key and press X, followed by Y and then the Enter key.
要保存更改,请按住Ctrl键,然后按X ,再按Y ,然后按Enter键。
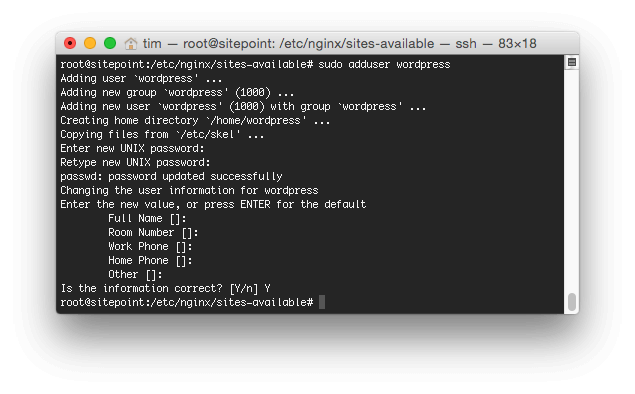
创建SSH登录 (Creating a SSH Login)
For security reasons, we don’t want to run WordPress as the root user. Let’s go ahead and create a new server user for that purpose:
出于安全原因,我们不希望以root用户身份运行WordPress。 为此,我们继续创建一个新的服务器用户:
sudo adduser wordpress
sudo adduser wordpress
Enter a password for this user, and then just press ‘Enter’ on the other fields.
输入该用户的密码,然后在其他字段上按“ Enter”。
Next, add our new wordpress user to the www-data group. This is the group used by PHP, so when we go to upload WordPress files, they’ll correctly run:
接下来,将我们的新wordpress用户添加到www-data组。 这是PHP使用的组,因此当我们上载WordPress文件时,它们将正确运行:
sudo usermod -a -G wordpress www-data
sudo usermod -a -G wordpress www-data
We need to tell PHP which user and group can run PHP files:
我们需要告诉PHP哪个用户和组可以运行PHP文件:
sudo nano /etc/php5/fpm/pool.d/www.conf
sudo nano /etc/php5/fpm/pool.d/www.conf
Scroll down until you find the user = www-group line, and change this to:
向下滚动,直到找到user = www-group行,并将其更改为:
user = wordpress
user = wordpress
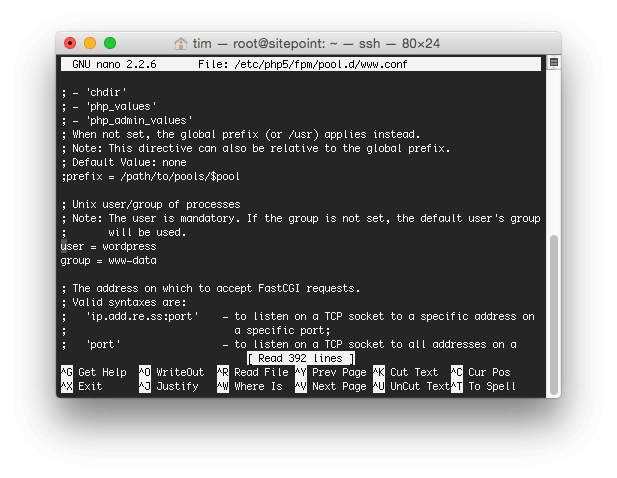
To save our changes, hold down the Ctrl key and press X, followed by Y and then the Enter key.
要保存更改,请按住Ctrl键,然后按X ,再按Y ,然后按Enter键。
重新启动服务器 (Restart the Server)
To make sure everything’s working, let’s restart the server:
为了确保一切正常,让我们重新启动服务器:
reboot
reboot
登录并安装WordPress (Login and Install WordPress)
To install WordPress, let’s log back into the server and then enter the following commands:
要安装WordPress,让我们重新登录服务器,然后输入以下命令:
cd /usr/share/nginx wget http://wordpress.org/latest.tar.gz tar xfz latest.tar.gz mv wordpress/* ./ rm latest.tar.gz rmdir wordpress
cd /usr/share/nginx wget http://wordpress.org/latest.tar.gz tar xfz latest.tar.gz mv wordpress/* ./ rm latest.tar.gz rmdir wordpress
The above commands download WordPress from wordpress.org, extract/unzip it into the /usr/share/nginx/wordpress folder. We then move the contents of that folder back into /usr/share/nginx before removing the original download file and WordPress directory.
上面的命令从wordpress.org下载WordPress,将其解压缩/解压缩到/usr/share/nginx/wordpress文件夹中。 然后,在删除原始下载文件和WordPress目录之前,我们将该文件夹的内容移回/usr/share/nginx 。
To avoid file permission issues when trying to install Plugins or upload images, let’s recursively set permissions on nginx’s web accessible root folder to the wordpress user and www-data groups that PHP is configured to use:
为了避免在尝试安装插件或上传图像时出现文件权限问题,让我们递归地将nginx的Web可访问根文件夹上的权限设置为PHP配置为使用的wordpress用户和www-data组:
sudo chmod g+w /usr/share/nginx -R sudo chown -R wordpress:www-data /usr/share/nginx
sudo chmod g+w /usr/share/nginx -R sudo chown -R wordpress:www-data /usr/share/nginx
Next, in your web browser, load http://123.123.123.123 (or http://www.domain.com, if you’ve set your domain’s A name record to point to your server’s IP address).
接下来,在您的Web浏览器中,加载http://123.123.123.123 (或http://www.domain.com ,如果您已将域的A名称记录设置为指向服务器的IP地址)。
If everything worked, you’ll see the familiar WordPress configuration screen. Click Let’s go!, and then enter the following information on the next screen:
如果一切正常,您将看到熟悉的WordPress配置屏幕。 单击“开始”! ,然后在下一个屏幕上输入以下信息:
- Database Name: wordpress 数据库名称:wordpress
- User Name: wordpress 用户名:wordpress
- Password: [the password you entered when setting up MySQL] 密码:[设置MySQL时输入的密码]
- Database Host: localhost 数据库主机:localhost
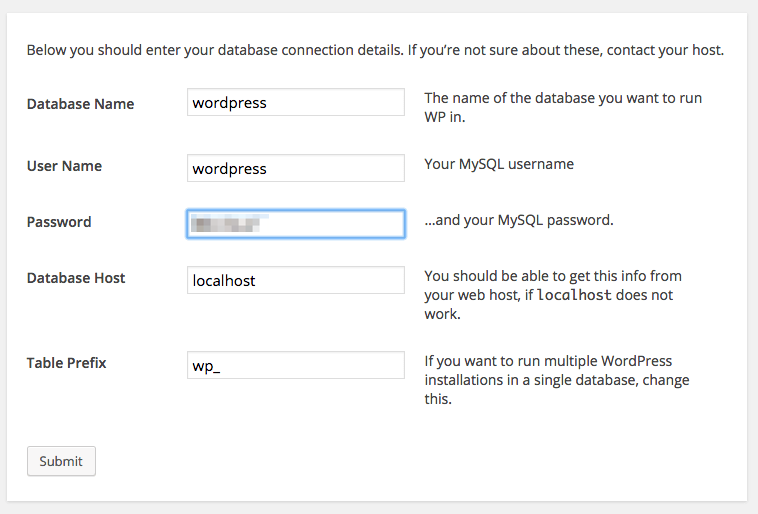
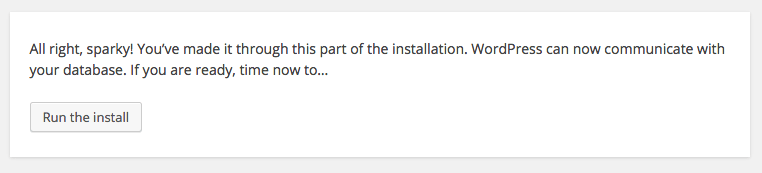
Click Submit, and if the details are correct, you’ll be asked to run the installation:
点击提交 ,如果详细信息正确,将要求您运行安装:
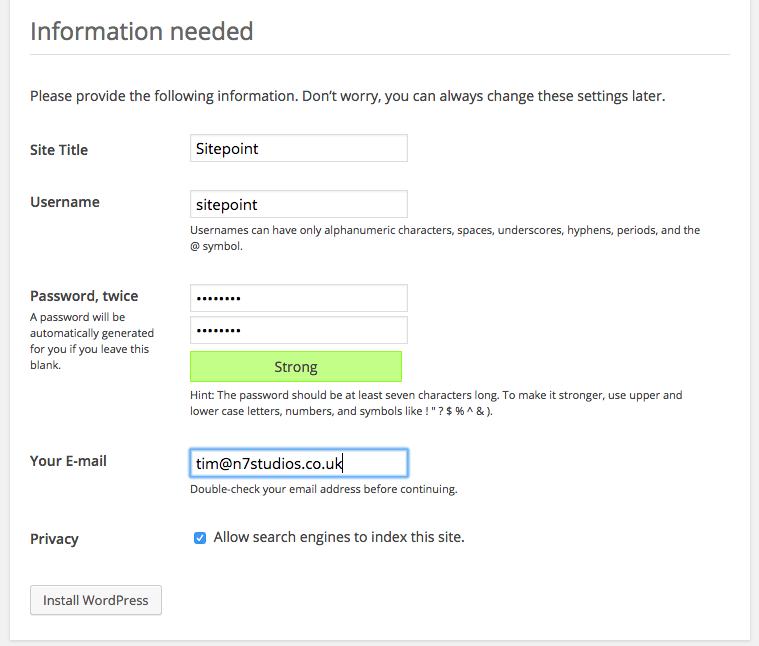
Enter your ‘Site Title’, ‘Username’, ‘Password’ and ‘Email Address’ before clicking Install WordPress
输入您的“网站标题”,“用户名”,“密码”和“电子邮件地址”,然后单击“ 安装WordPress”
That’s it!
而已!
结论 (Conclusion)
We’ve successfully created a VPS on DigitalOcean, and logged into it over SSH. We’ve then installed nginx, PHP and MySQL, and configured each to work with WordPress.
我们已经在DigitalOcean上成功创建了VPS,并通过SSH登录了它。 然后,我们安装了nginx,PHP和MySQL,并分别配置为可与WordPress一起使用。
We’ve also setup a server user, and granted them permissions on our WordPress installation.
我们还设置了服务器用户,并为他们授予了WordPress安装的权限。
Finally, we confirmed everything worked by running through the WordPress installation process.
最后,我们通过运行WordPress安装过程来确认一切正常。
翻译自:
lemp wp
转载地址:http://rzrgb.baihongyu.com/